
Switch to draftPreview(opens in a new tab)UpdateAdd title

Greeting, Crochet-Luvin’ Friends!
Last week, on one of the crochet groups I belong to on Facebook, The Crochet Crowd Stitch Social, a friend named Lisa posted a picture of a blanket she saw online to which she was unable to find the pattern. She asked if anyone wanted to help her deconstruct it so she could crochet her own version.
Naturally, I chose to spend a couple days on this rather than write, because, you know, procrastination. This is what I came up with. Enjoy!
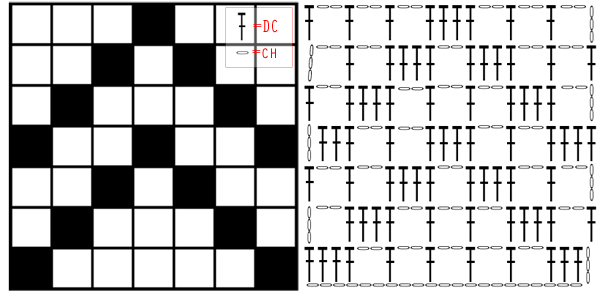
First of all, I learned the blanket is worked in filet crochet. I wasn’t familiar with filet crochet, so I did my homework.

Basically, filet crochet is worked in blocks of three or four stitches (3DC or 4DC filet). Ideally, a block is as tall as it is wide. This creates a square within which you can create beautiful images and patterns that have a lacy feel. It is often worked with thread.
Diretions for filet crochet are often provided in a chart with black boxes representing “blocks” and white boxes representing open mesh.
If you’ve never done, filet crochet, take a look at these instructional posts before moving on:
Tutorial – Basic Filet Crochet
Tips and Tricks for beautiful filet crochet:
Most important tips I took away from the above post:
1. Extended dc makes for a better, more square look than regular dc. Regular dc makes a kind of squat looking square. An extended dc gives you a stich height somewhere between a dc and a tc (US terminology).

To work extended dc: Yarn over, insert your hook in the indicated stitch, yarn over, pull up a loop, yarn over, and draw through 1 loop on your hook (yarn over, draw through 2 loops) 2 times.
2. Blocking is very important with filet crochet. It smooths the bumps in the stitches and makes the pattern pop:

Here is another helpful post. It has a tutorial on 3DC filet, which is what I think the “Daisy Blanket” pattern is based on (as opposed to 4DC filet, the other common type:
https://crochetistheway.blogspot.com/2014/04/how-to-3-dc-filet-crochet.html
Now that you’re a pro at filet crochet, here’s my attempt at recreating the Daisy Blanket pattern.
Recreated Pattern
I worked on recreating the body stitch first. The border patterns are at the end.

Here’s a picture of the swatch on its own:

Notes:
This is my best guess in replicating the stitch seen in the blanket photo. My guess is the blanket was worked on smaller yarn and hook size than I used, since mine looks chunkier. But I think I managed to capture the spirit of the stitch.
The pattern is worked over 4 rows.
The swatch in the image was worked with Paintbox cotton yarn in peach orange and a size 3mm hook. This is 1 to 1.5 mm smaller than the recommended hook size.
The type of crochet is 3dc filet.
The pattern below uses US terminology.
Hook size, tension, and blocking are all very important for this stitch (as for any filet project). You may want to create a few swatches trying different yarns and hook sizes to see which looks best for your project.
Your stitches will look much neater after careful blocking, so don’t be discouraged if your work doesn’t look quite right as you get going.

When in doubt, go with a smaller hook size. The tighter your stithes, the neater your work will look. The above swatch was worked on a 3mm hook. The swatch below was worked on a 3.5 mm hook. The pattern gets lost and doesn’t “pop” with the larger hook size.

One of the stitches in my pattern is a monster of a stitch. If you want a simplified version of the pattern, I worked a swatch and provided directions below (see VariationDirections).

Personally, I prefer th simpler version shown above. The open diamonds make for a lacier look than the diamonds filled with a picot. The variation is also less of a yarn eater.
Are you ready to get hooking?
Stitches Used:
Edc = extended double crochet
The edc is a slightly taller version of the standard dc. It’s height will be between that of a dc & tc.
To work, yarn over, insert your hook in the indicated stitch, yarn over, pull up a loop, yarn over, and draw through 1 loop on your hook (yarn over, draw through 2 loops) 2 times.
2edctog decrease = 2 edc together worked in a decrease over the ch3-picot-ch3 in row 1
This is a monster stitch. Buckle up. Here we go.
To work, yo, insert hook into same st previously worked, as you would for a v-st
Pull up loop, yo, pull through 1 loop
Yo, pull through 2 loops. You have 2 loops on hook.
Insert hook through the top stitch of the pico (either 3rd or 4th st depending on how tightly you chained your pico). You now have 2 loops and the pico on your hook.
Yo, insert hook into next edc from previous row, pull up loop, yo, pull through 1 loop
Yo, pull through 2 loops. You now have on your hook, loop, pico, loop, loop.
Yo, pull through all loops/pico on hook.
Directions:
Chain 34
Row 1: Edc in 5th chain from hook, *ch3, sk1, sc, (chain 6, slip st into base of sc to form 6-st picot), ch3, sk1, 5 edc* Repeat from * to last 5 st, In last 5 stitches, ch3, sk1, sc, 6-st pico, ch3, sk1, edc, edc in last st, turn.
Row 2: Ch3 (counts as first edc), edc, *ch1, work 2edctog decrease (see stitch guide), ch1, ecd in same st (1st of 5 edcs from row 1), 4 edc * Repeat from * to end, omitting last 4 edc and instead working a single edc into turning chain, turn.
Row 3: Ch3, (counts as edc), *edc, edc in ch1 space, edc in the top of the 2edctog decrease from previous row (optional, before inserting hook to work this edc, dip the hook through the bar and then into the indicated stitch, work the stitch as normal. This creates a nicer looking back of the work for a more reversible fabric), edc into ch1 space, edc, ch3, sk1, sc, (chain 6, slip st into base of sc to form 6-st picot), ch3, sk1* Repeat from * until last st, work edc in turning chain, turn.
Row 4: Ch3, 5edc, *ch1, work 2edctog decrease, ch1, ecd in same st (1st of 5 edcs from row 1), 4 edc * Repeat from * until last st, work edc in turning chain, turn.
Row 5: Ch3 (counts as first edc), edc, *ch3, sk1, sc, (chain 6, slip st into base of sc to form 6-st picot), ch3, sk1, edc, edc in ch1 space, edc in the top of the 2edctog decrease from previous row (optional, before inserting hook to work this edc, dip the hook through the bar), edc into ch1 space, edc* Repeat from * until last st, work edc in turning chain, turn.
Repeat rows 2-5 until work reaches desired length.
(Please forgive typos/errors. I am not a professional pattern writer.)
Variation Directions:
Note: I worked the variation in a thicker yarn, Loops and Threads Impeccable with a size 4.5 hook. I wanted to see how the pattern looked on a larger scale. If I made this blanket, I would probably use a thicker yarn so I could get a larger blanket for the same number of stitches. Going up in size of yarn & hook in filet crochet is called “Exploding” the pattern.
Personally, I prefer the variation over the original stitch. I feel like the open diamonds create a lacier look, and the pattern requires less yarn because you’re omitting the 6-st pico.


To work:
Chain 34
Row 1: Edc in 5th chain from hook, *ch3, sk1, sc, ch3, sk1, 5 edc* Repeat from * to 5 st from end. In last 5 stitches, ch3, sk1, sc, ch3, sk1, edc, edc in last chain, turn.
Row 2: Ch3 (counts as first edc), edc, *ch1, work 2edctog decrease (see stitch guide & omit the part involving the pico), ch1, ecd in same st (1st of 5 edcs from row 1), 4 edc * Repeat from * to end, omitting last 4 edc and instead working a single edc into turning chain, turn.
Row 3: Ch3, (counts as edc), *edc, edc in ch1 space, edc in the top of the 2edctog decrease from previous row, edc into ch1 space, edc, ch3, sk1, sc, ch3, sk1* Repeat from * until last st, work edc in turning chain, turn.
Row 4: Ch3, 5edc, *ch1, work 2edctog decrease, ch1, ecd in same st (1st of 5 edcs from row 1), 4 edc * Repeat from * until last st, work edc in turning chain, turn.
Row 5: Ch3 (counts as first edc), edc, *ch3, sk1, sc, ch3, sk1, edc, edc in ch1 space, edc in the top of the 2edctog decrease from previous row, edc into ch1 space, edc* Repeat from * until last st, work edc in turning chain, turn.
Repeat rows 2-5 until work reaches desired length.
Border Directions
The border is worked in 3 parts.
Part one is a sc all the way around the swatch, then a *dc, ch1, sk1* mesh-like stitch all the way around (make sure to work extra stitches in at the corners). Work regular dcs for the border, not edcs.
Part 2 (part with applique daisies) is linen st, which is worked over 2 rows. Row 1: *sc, ch1, sk1* all the way around. Row 2, work *sc, ch1, sk1* but work the scs into the chain-1 spaces from row 1. Work the linen stitch around as many times as you want. In the picture, it looks like it was worked over 12 to 14 rows.
Part 3 is a lacy border, which I didn’t try to recreate. You can do a search online for lacy blanket borders and pick one you like.
Thank you for reading! Let me know what you think of my recreation!
If you appreciate this post, take a look at my books. Don’t feel pressured to buy unless something really appeals to you!

2020 Seedling Wrap by Jessi Gage, patten below
This page is totally unrelated to writing. I guess I have creative ADD because I can’t focus on a single creative exercise. I write, then I crochet. Then I have to write. Then I need a break from the thinking and just want to crochet. It goes back and forth like that.
Here’s a page for patterns I wrote myself and links to patterns I love. I hope you enjoy!
I am in love with wraps. They work up relatively quickly and can be worn a multitude of ways. My favorite yarn to work with is fine or fingering yarn, the softer the better. My new favorite is Loops and Threads Woolike.
The pros of this yarn are that it’s super soft and super affordable. It looks amazing and feels even better. It gets an A+ in wearability.
The cons: It’s hard to find in the colors you want. Michaels carries Loops and Threads yarn, but at my local store, there are only ever a few colors of this awesome yarn.
I found a nice variety of colors on Ebay, so I went ahead and paid the crazy shipping to get my hands on enough colors that I could be inspired. Sure enough, when the box came, my imagination went wild!

I instantly wanted to make a wrap using every color in the box. Here’s the pattern for the wrap I designed. It’s free to use. I just ask that you don’t sell the pattern or anything you make from it.
My WIP is pictured above! I can’t wait to post a finished wrap!
Show me your projects! Have fun crocheting! (Then go read one of my books, lol!)


